- testing
- morphology observation
- microstructure analysis
- surface element analysis
- surface foreign body
- component analysis
- mechanical property test
- thermal analysis
- welding qualification
- ct scan
- nondestructive testing
- cross section analysis
- coating thickness
- flame retardant test
- abration test
- coating quality inspection
nondestructive inspection
| visual inspection | nondestructive inspection |
| tensile testing | surface crack detection |
| bend test | impact test |
| low times metallographic test |
x-ray inspection
testing range:
full penetration butt weld, t-joints, pipes, fillet weld and so on.
x-ray inspection is one of accurate and reliable methods to test defects inside the welding line. the shape, position and size of defects inside the welding line can be detected. the principle of x-ray inspection: it uses different degrees of high-energy x-ray to penetrate opaque objects making photographic film to be light-sensitive, thereby performing welding inspection. surface inspection must be carried out prior to x-ray inspection for welding line. the irregular degree of surface should not impede the identification of defects on the film; otherwise it should be to recover.
ultrasonic testing technology
testing range:
full penetration butt weld, t-joints, pipes, fillet weld and so on.
ultrasonic testing level is divided into a, b, c three detection levels. ultrasonic testing level selection should be consistent with the manufacture, installation, use and other relevant norms, standards and design drawings.
level requirements for different detection techniques
1.a level detection a level detection technology is suitable for supporting structures related to pressure equipment in welded joint testing.
2.b level detection b level detection technology is suitable for general pressure equipment in welded joint testing.
3.c level detection c level detection technology is suitable for important pressure equipment in welded joint testing. when using c level detection for welded joint testing, the weld reinforcement should be polished.
the main point of the base metal detection is as follows:
testing method: contact pulse reflection method, with a frequency of 2mhz ~ 5mhz straight probe, wafer diameter 10mm ~ 25mm.
detection sensitivity: adjusting the second wave to display 100% full of scale where there is no defect.
when the defect signal amplitude exceeding 20% of full scale, it should be marked on surface and recorded.

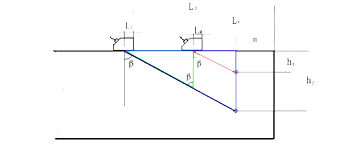
schematic of double holes measuring probe frontier and k values
determination of defect position
horizontal positioning method:
when the instrument is at the level of 1:n to adjust scanning speed, horizontal positioning method should be adopted to determine the position of defect. if the instrument is at the level of 1: 1 to adjust the scanning speed, the cutting-edge of defects wave (simulator) on the screen corresponding to the horizontal scale value is the horizontal distance of the defect.
depth positioning method:
when the instrument is at the depth of 1:n to adjust scanning speed, depth positioning method should be adopted to determine the position of defect. if the instrument is at the depth of 1:1 to adjust the scanning speed, the cutting-edge of defects wave (simulator) on the screen corresponding to the horizontal scale value is the horizontal distance of the defect.
- learn more
- qualification and honor
- contact us
- contact us
mtt shenzhen
tel: 400-850-4050
fax: 0755-2782 1672
email: marketing@mttlab.com
mtt suzhou
tel: 400-118-1002
fax: 0512-6275 9537
email: marketing@mttlab.com
mtt shanghai
tel: 400-118-1002
email: marketing@mttlab.com
mtt dongguan
tel: 400-116-1002
email:marketing@mttlab.com
